Thursday 29 September 2011

Ko uchi gari

Ko uchi gari is a small technique, but a phenomenally powerful one when pulled off perfectly, capable of knocking someone unconscious.


When its not being used to flatten people Ko uchi gari is a perfect attacking technique to induce movement and create opportunities and as such is very often used as the first technique in combinations with major throws.

A deceptively simple looking technique, there are several key points that should be born in mind when practicing it.

Body positioning

Body positioning is the biggest cause of throw failure and wasted practice time when it comes to Ko uchi gari. Or more accurately, incorrect body positioning is the biggest issue.

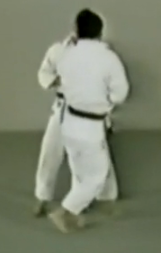
Its very common when beginners are introduced to Ko uchi gari or are practicing it either as a solo technique or as part of a combination, that they bend over at the waist as the apply kuzushi or try to sweep.


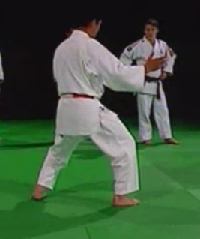
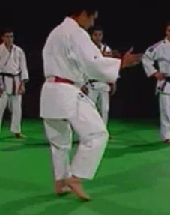
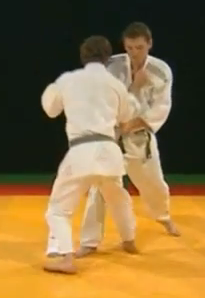
It is vital to ensure a good Ko uchi gari that tori’s body is upright when attacking.


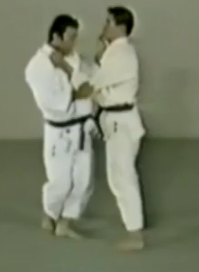
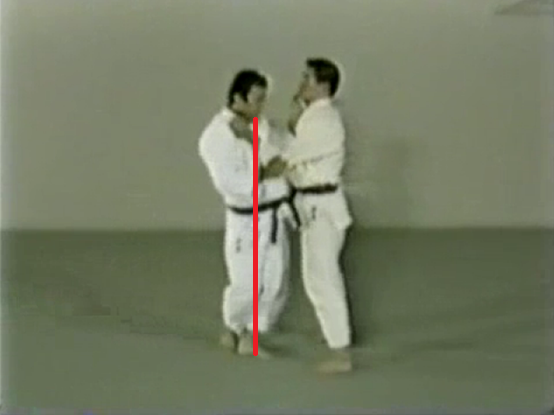
However, this doesn’t mean that tori should be bolt upright on tip toes.

Tori’s upper body should be upright, but his centre of gravity lowered so that it is below uke’s.


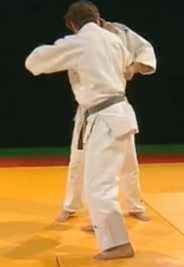
Tori should also concentrate on attacking the chest, ensuring that he doesn’t enter for the thow side on.


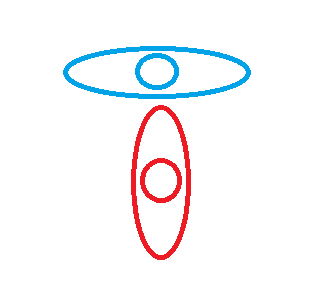
Instead tori should attempt to ensure he is making as much chest contact as possible and that as much as possible his shoulders are in the same plane as uke’s.


Correct body positioning is vital and by ensuring your position your body for Ko uchi gari, correctly. You will find that the other aspects start to fall into place fairly naturally.

Hands

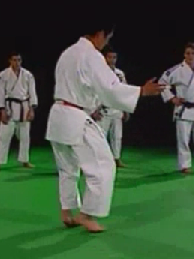
As in other ‘Gari techniques’ tori should concentrate on attacking the chest with the hand action.

The tsurite is very important in all ‘Gari techniques’ and is equally important in Ko uchi gari.
The forearm makes firm and sustained contact with uke’s chest.


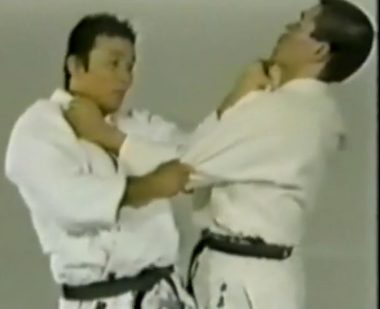
The sleeve hand draws downwards and towards tori’s hip.


As in all techniques both hands should work together and simultaneously. So that uke’s weight is shifted on to the rear of the heel about to be reaped.


So that when the foot action is performed uke is perfectly position to be thrown.

Feet

As I see it there are two main ‘schools of thought’ on the foot action for Ko uchi gari.

There is the school I ascribe to which is the oikomi school of thought, in which a tsugi ashi foot movement is used to create a very powerful explosive attack and there is the ‘touch step/kick out’ school where the attack is less explosively and relies more on the reaping action.

Regardless of the exact footwork one point remains constant.

The foot should be turned over and cupped so that the sole of the foot is what makes contact with uke’s ankle, not the ridge of the side of the foot or the instep.
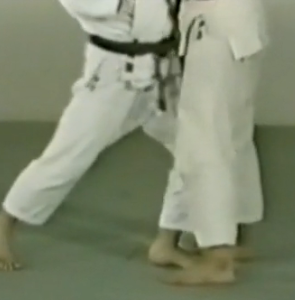


Tsugi ashi


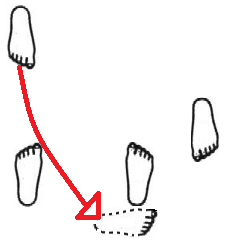
In this form of Ko uchi gari the tusgi ashi foot movement is used to generate force and then applied to power the reaping action.

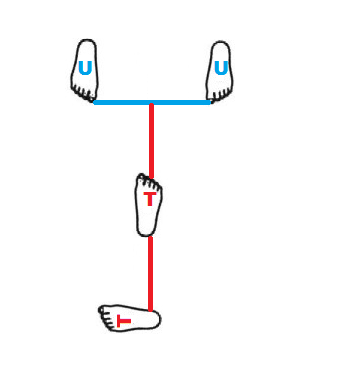
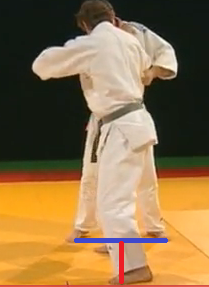
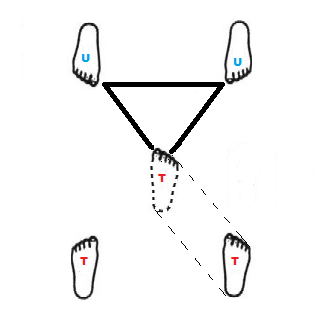
The rear foot is brought to the front foot to provide impetus for the action of the advanced reaping foot.


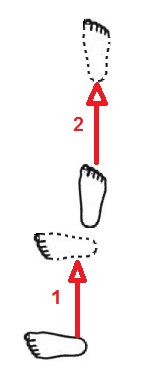
The foot is then reaped roughly into the area indicated by the red box.


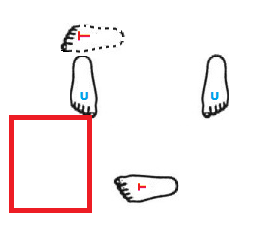
Some reap almost directly forwards akin to Ko soto gari others add some degree of diagonal angle to the reap.

I personally prefer this version, because it suits my style of Judo, which as a heavyweight tends to be fairly sedate with little movement. So opportunities for the drawing out/hikidashi style of Ko uchi gari so often practiced in this drill.


Are very few and far between.

As an aside, I loathe this drill with an absolute passion.

I think its literally the worst drill in Judo and whenever I’m at a club and end up doing it, every second of it I feel my blood pressure rising.

I hate it for two main reasons.

Basically no one uke’s for it properly. Instead of stepping forward and allowing themselves to have the weight brought onto their heels. They stomp the foot forward as if doing a Sumo shiko and as a result no one learns anything except how to waste everybody’s time.

Its utterly useless for teaching beginners, because to try and avoid the Sumo stomp people try and rush to get the sweep in before uke’s clubbed foot becomes glued to the mat. They forget all about the hands, body positioning etc and concentrate solely on stepping back and sweeping as quickly as possible.

So its a shit drill, please stop using it coaches. Unless you really, really, really hammer home to uke that it isn’t a contest into who can stomp the mat the hardest and that they’re actually supposed to help their partner out...

And even then, there are better options.

Touch step

Another common footwork for Ko uchi gari, in my experience is what I call the touch step movement.
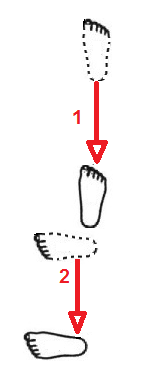
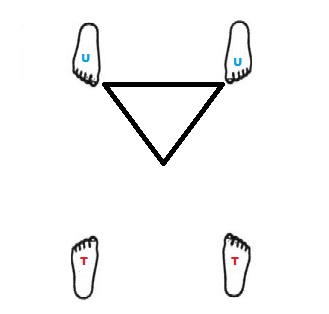
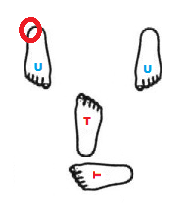
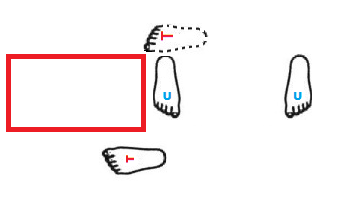
In the touch step foot pattern the planted foot is brought to the reaping foot.


The advanced to the side of the foot about to be reaped.


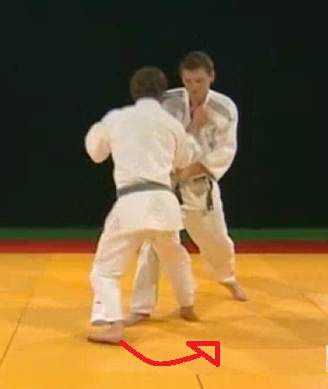
Then the reaping foot attacks the intended foot.


The foot is then reaped roughly into the area indicated by the red box


Some perform a very linear reaping action, most tend to do it in a shallow parabola.

Kick out

The ‘kick out’ Ko uchi gari is one of the other most commonly seen variations, it can be done with either the tsugi ashi foot action or the touch step foot action.

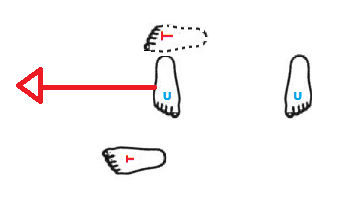
However, the initial footwork is done the reaping action is always the same.

The foot is literally kicked outwards laterally.


I don’t think its particularly important which action you do. Although I personally don’t teach the kick out, because I believe its too easily open to abuse.

Rather if you concentrate on getting the body positioning and hand action right then the exact foot action becomes of less consequence.

Combinations

Ko uchi gari is a fantastic technique for use in creating opportunities and linking to big throws. As such its used a lot in combinations.

Some examples of combinations involving Ko uchi gari.

Ko uchi gari into Uchi mata


Seoi nage into Ko uchi gari


Ko uchi gari into Tai otoshi


As always, I hope this has been useful to people and comments, critiques and criticisms are welcome.

Monday 19 September 2011

Tsugi ashi


So what is Tsugi ashi?

Tsugi ashi refers to a stepping pattern in Judo where one foot replaces the other before that foot can move. So that the trailing foot moves to the front foot then the front foot advances or the front foot retreats to the trailing foot then the trailing foot retreats.

The basic movement looks like this


Broken down we see that tori starts in a sort of T-ed upposition


Tori then moves his trailing foot to his front foot


And advances with his front foot


The whole movement looks like this:


Throughout the movement tori keeps his hips central and his head roughly above his hips.

The same process is repeated when retreating, the advanced foot retreats first to the position of the trailing foot. Then the trailing foot retreats.


The core of the tsugi ashi movement lies in the production and transference of power from the advanced or trailing foot through the hips into the upper body of tori. Normally, however, the power generation is from the trailing foot through the hips as tsugi ashi is rarely used in competition or randori going backwards.

One of the few exceptions is this classic tsurikomi/ kuzushi drill, which I do a few sets of every session and I would urge others to do as well:


One of the major flaws with beginners attempting the tsugi ashi movement comes when advancing. 9 times out of 10 a beginner will take a little step with their advanced foot first and then bring their trailing foot up to the advanced foot. This is natural as we are used to going forward by stepping with the advanced foot, it just makes sense. However, the movement, tsugi ashi, in Judo is very specific and serves a purpose to maximise forward transference of power and speedy entry. So it is vital that you ensure you only move the trailing foot first when advancing and only move the advanced foot first when retreating. Otherwise the movement fails.

Applying Tsugi ashi

Here Okano sensei demonstrates various applications of tsugi ashi:


Katanishi sensei demonstrates how tsugi ashi can be applied to the action- reaction sequence for forward throws:


Katanishi sensei demonstrates tsugi ashi as a ‘hip bump’ as part of the action-reaction sequence. This use of tsugi ashi was a favourite of Neil Adams albeit usually for Tai otoshi.


Here the applicability of the tsugi ashi movement for various throws including Ko uchi makikomi and Sukui nage is demonstrated:


Here for Ko uchi gari:


And here for Tai otoshi


Sunday 18 September 2011

Positioning for Nagewaza

This is an updated, revised and expanded version of a previous article – Practising Combinations. If you wish to still view the original un-revised article it will remain on the blog, but is now superseded by this article.

One of the biggest issues beginners have is practicing combinations whilst moving and especially so when the movement isn’t linear and is a free moving situation.

There are of course a number of reasons behind this, lack of control, poor spacing, simply not being good at the individual throws etc...

However, a major factor is a lack of awareness of how to properly position yourself relative to your partner in order to throw them.

T-ing Up

I was taught the concept of positioning for nagewaza as ‘t-ing up’, I have heard Neil Adams refer to it as ‘setting your line up’ your coach or club may have a different name for it. Regardless of what you call it the principle is universal and fundamental.

If you’re T-ed up you’re standing with your lead foot advanced at the peak of the triangle, you other foot roughly shoulders width behind it and your partner standing with both feet level.


Imagine that there is an invisible line running between uke’s toes and that it is bisected by another invisible line that runs between tori’s feet. These lines bisect each other in such a way that the line between uke’s feet forms the horizontal cross bar of a T shape and that the line between tori’s feet forms the vertical upright bar of the T.


This position should be familiar to most people because it is roughly how you’re positioned after you’ve taken your first step when practicing uchikomi or nagekomi.


From this position you’re ideally placed to turn in for a throw and your opponent is ideally positioned to be thrown.


Note that the foot positioning is not set in stone and the trailing foot doesn’t have to be precisely behind the advanced foot.


The vertical line of the T is only a rough guide for foot placement and having the trailing foot ‘off centre’ of the T is not wrong.

Drilling positioning

In a static situation with a compliant partner its incredibly easy to get into the T-ed up position and then perform a throw.

However, beginners often struggle to T-up when moving around in a non linear fashion for uchikomi and nagekomi.

As such its usually necessary to drill moving around with a partner and positioning yourself to perform a throw.

Here in a free movement drill tori and uke moves around with tori leading the movement, getting into the T-ed up position and then performing tsurikomi.


Very few beginners, however, after being shown and having the T-ing up concept explained are able to go straight away into a free moving drill and control the movement so that the T-up properly.

So the drill needs to be introduced progressively. The most basic form of drilling for positioning is circling.


In which tori will start the movement by stepping out with his non-lead foot, for a right hander this will be his left, for a left hander his right, bringing uke around with him.

Here a simple circling drill is used to position tori and uke so that tori is T-ed up, lead foot at the peak of the triangle and therefore perfectly positioned to apply his throw.


This is relatively straightforward and most beginners are able to circle and T-up after a short amount of practice.

However, when attempting to apply the T-ing up concept to live uchikomi or nagekomi combination practice most beginners often struggle because its not a simple circling type action, unless the initial technique is a Hiza guruma or Sasae tsurikomi ashi.

Often beginners will find that after applying a technique like O uchi gari they’re left in this position.


Not T-ed up and impossibly placed to attempt any follow up technique except an O soto gari or Sasae tsurikomi ashi.

In this situation all that is necessary to T-up and be correctly positioned is a simple backswing with the trailing foot.


When a Ko uchi gari is the initial attack simply perform a ‘frontswing’ with the trailing foot to bring yourself into position.


Sometimes during free moving uchikomi or nagekomi you will need to create space as part of your tai sabaki to ensure you’re correctly positioned and T-ed up.

To do this a simple method is what I call ‘pulsing’ where you use the tsugi ashi foot movement to ‘pulse’ your partner away to create space.


Just for forward throws?

Although most of the examples so far have been of the T-ing up positioning concept being used for forward throws it also applies to backwards throws as well.

The T-ing up concept being used to position for O uchi gari


The T-ing up concept being used to position for O uchi gari following an O soto gari attack


T-ing up for combinations

The real usefulness of the T-ing up concept is in helping people position themselves properly for practicing combinations.

Here for a Ko soto gari to Tai otoshi combination


O soto gari to O uchi gari


O uchi gari to Tai otoshi in kenka yotsu


Should I do this in randori?

Often when introduced to the T-ing up concept beginners will move around and try and get in precisely that position with the feet in complete alignment and attempt throws. This will almost always fail as the position’s purpose is to teach a concept not a cast iron rule.

Also beginners often try walking around T-ed up, again this is a mistake as its a position that’s basically impossible to get into or maintain against skilled opposition without being thrown and again the position is conceptual not mandatory.

That being said the concept can often be seen being applied in contests and randori. Here in a ‘grip to throw’ sequence Jeon of Korea brings his opponent into the T-ed up position through use of movement and scores Ippon.